
This horn hat pattern is a free pattern expansion for the Grinning Gator pattern from Fostering Sewing: https://www.etsy.com/shop/FosteringSewing
You can also use the Croki pattern pieces to upgrade any premade stuffed alligator and can even add it to other animals (like the "glorious porpoise" meme I have seen going around).
Getting Started
Before You Begin
Read the entire tutorial to get an idea of how the pieces fit together and what to expect.
Note that all pattern pieces have a 1/4” seam allowance. The sew line is marked by a dashed line on the pattern.
Prewash your fabric in the same way that you will wash your finished product (or run it through the washer and dryer just in case this happens to your finished plush).
Fabric Recommendations
This pattern is designed for mid weight woven fabric like quilting cotton. You are welcome to experiment with other fabric types and textures, but this may change the final shape.
Printing
I recommend using the latest version of Adobe Acrobat. You can get it for free here.
Print the document at 100% or actual size. The Croki Horn Hats are available in US Letter and A4 sizes. Choose the one that is applicable to you.
Before cutting out pattern pieces, measure the 2” x 2” square. This will ensure that your pattern pieces are the right size.
US Letter Croki Pattern Pieces
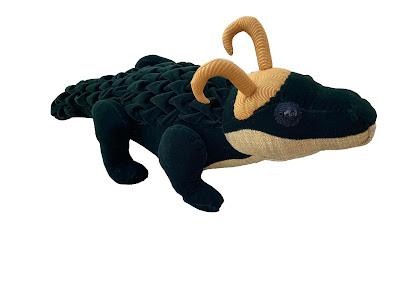 Putting the Loki Horn Hat Together

Assemble the Pieces
Cut out two Croki Cap pieces and four Croki Horns (two reverse).

Pin and sew the two Croki Cap pieces (right sides together). Make sure that the marked area is left open for turning and stuffing.
Pin and sew two sets of Croki horns (right sides together). Leave the bottom of the horns open for turning and stuffing.


Firmly stuff the horns. Start with small bits of stuffing, making sure that it gets pushed all the way into the tip of het horn. There is no additional support for these pieces (wire, etc), so the stuffing is the thing that will keep the horns upright.
Loosely stuff the cap, just enough to give it a bit of dimension but not enough to fill it up.

Ladder stitch the opening on the cap closed.
Pin the cap onto the Alligator's head, just behind the raised eyes (where the head begins to flatten.) Then ladder stitch it into place.


Once the cap is secure, pin the horns in place. The dotted circles on the pattern pieces are to help with alignment, but you are welcome to play around with the horn placement and find the look that you like best.
Once you are happy with the horn placement, ladder stitch the horns in place.


Putting the Sylvie Horn Headband Together
Assemble the Pieces
Cut out two Sylvie Headband pieces and four Sylvie Horns (two reverse). Disregard the straight dotted line on the horns for the time being.

Pin and sew the two Sylvie Headband pieces (right sides together). Make sure that the marked areas on each end are left open for turning and stuffing.
Pin and sew two sets of Sylvie Horns (right sides together). Leave the bottom of the horns open for turning and stuffing.


Thank you for this fun add-on!
ReplyDeleteAbsolutely! Many more addons to come in the future.
Delete